

WooCommerce store owners often look for efficient ways to manage order fulfillment without adding extra work. One of the most straightforward areas to optimize is shipping documentation. Instead of searching for scattered solutions, there is a reliable plugin that brings everything together: the WooCommerce Shipping Labels, Dispatch Labels, and Delivery Notes plugin by WebToffee.
This plugin goes beyond basic features, offering store owners an easy path to generate shipping-related documents directly from their WooCommerce dashboard. It simplifies how you handle and fulfill WooCommerce orders, leaving you with more time to focus on business growth rather than repetitive tasks.
By automatically generating shipping labels, store owners avoid errors in customer details, reduce the time spent per order, and improve overall efficiency. It’s not a “nice-to-have” but a baseline practice that helps ensure customers get their packages correctly and on time.
Auto-generating Shipping Labels with WebToffee
To begin with, WooCommerce doesn’t come with built-in tools to generate shipping labels or dispatch documents. Store owners usually explore plugins to fill this gap.
Whether you’re preparing shipments for a small store or managing higher order volumes, the plugin provides the tools needed to stay consistent and organized with your shipping process.
The free version of the WooCommerce PDF Invoices, Packing Slips, Delivery Notes, and Shipping Labels plugin by WebToffee is often the first step. It allows users to create shipping labels, dispatch labels, and delivery notes directly from the WooCommerce order page. For small stores or those testing the process, this free option is a practical entry point. However, its customization options are limited.
For those who want a more professional approach, the WooCommerce Pre-Order, Shipping Labels, Dispatch Labels, and Delivery Notes plugin premium comes into play. It expands the possibilities with advanced template customization, custom label formats, and the ability to automate across a larger order volume. This pro solution is specifically built for store owners who don’t just need basic documents but also want flexibility in design and automation.
Key features:
- Generate shipping labels, dispatch labels, and delivery notes
- Customize with built-in shipping label templates
- Visual and code-based editor
- Build reusable label templates
- Bulk print labels and delivery notes
- Enable label printing
- Compatible with multilingual plugins
How to Create, Automate, and Print Shipping Labels in WooCommerce
Once you’ve installed and activated the plugin, you can start setting up shipping labels directly from your WooCommerce dashboard. The process is simple, but paying attention to each configuration ensures your labels carry all the right details for smooth order fulfillment.
Step 1: Install and Activate the Shipping Labels Plugin
After purchasing and downloading the plugin from WebToffee, log in to your WordPress dashboard.
- Go to Plugins > Add New and upload the plugin file.
- Once it’s installed, click Activate.
You’ll now see the plugin options integrated into your WooCommerce settings.

Note: The pro plugin requires the free version to be installed and active for the settings to function properly.
Step 2: Access the Shipping Label Plugin Settings
After activation, navigate to Invoice/Packing > Shipping label from your dashboard. This is your control center where you’ll configure everything related to order and shipping documents.
The settings are organized into different tabs, each addressing a specific area such as customization of layout and automation preferences.
- Enable the option to generate multiple labels per page and set how many labels should appear in a row.
- You can define custom label sizes or select a full page layout
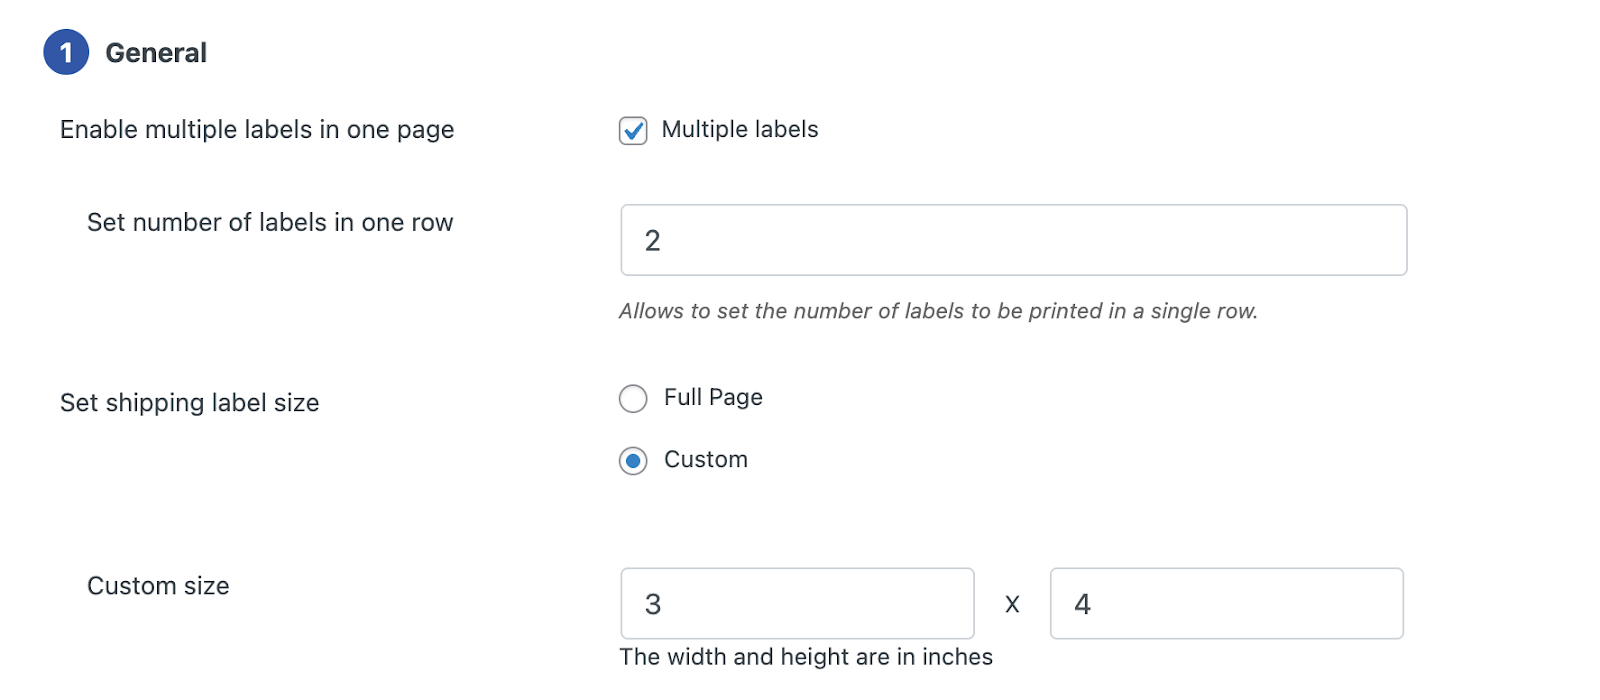
- You can also decide which order statuses display the “Print Shipping Label” button.
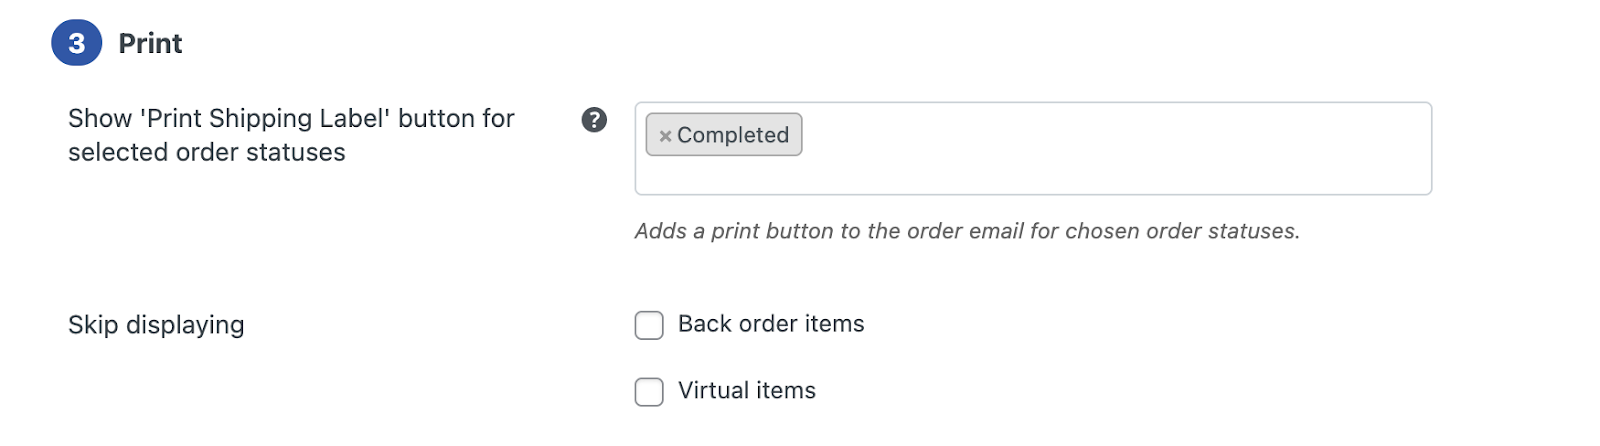
- Click Update Settings to apply changes.
Step 3: Customize the Shipping Label Format
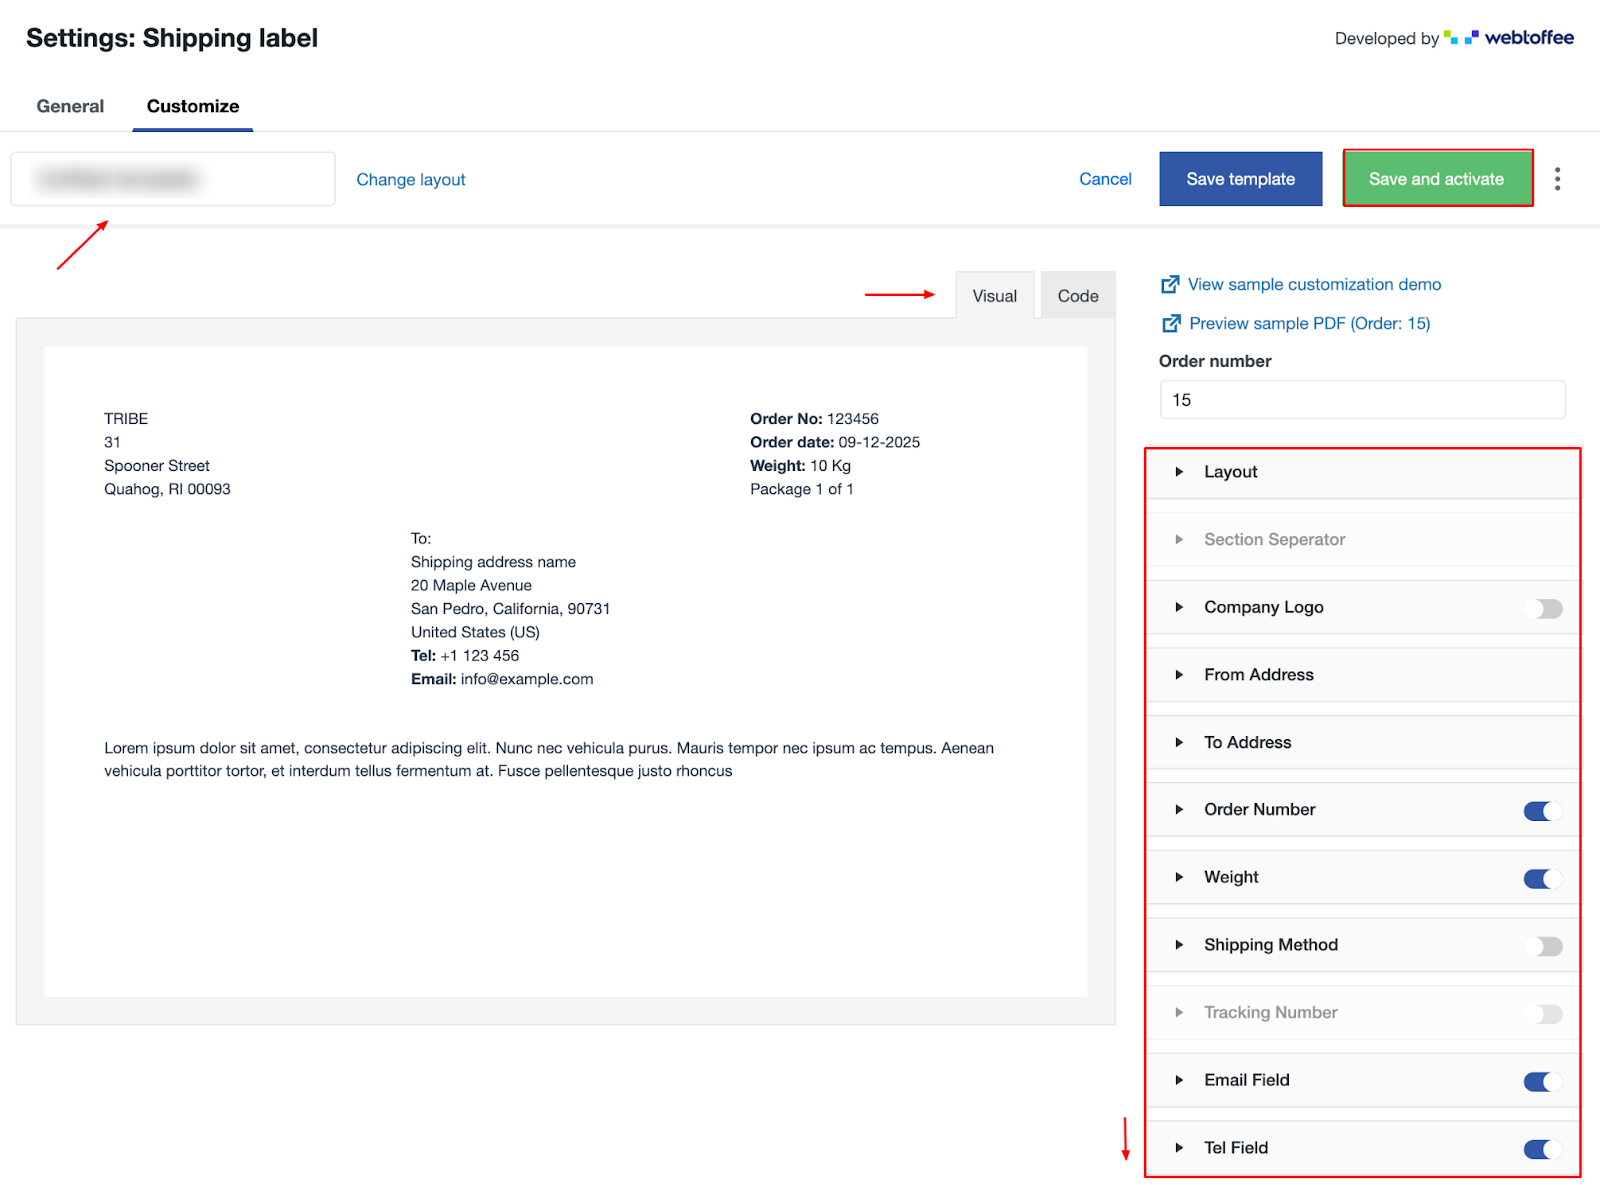
The plugin allows you to add your store logo, company name, return address, and other details to each shipping label. You can also define label layout.
- Navigate to Invoice/Packing > Shipping label > Customize tab.
- A default template is active; however, you can switch to a different layout by selecting Change layout.

- You can assign a name to reuse the shipping label layout later.
- On the right side, you can enable or disable label template elements and adjust their settings. The left side displays a live preview.
- You can also switch to the code editor to make further customizations.
- Once done, click Save and activate.
Step 4: Print Shipping Labels
Once generated, the WooCommerce shipping labels can be printed directly as PDFs for later use. For this,
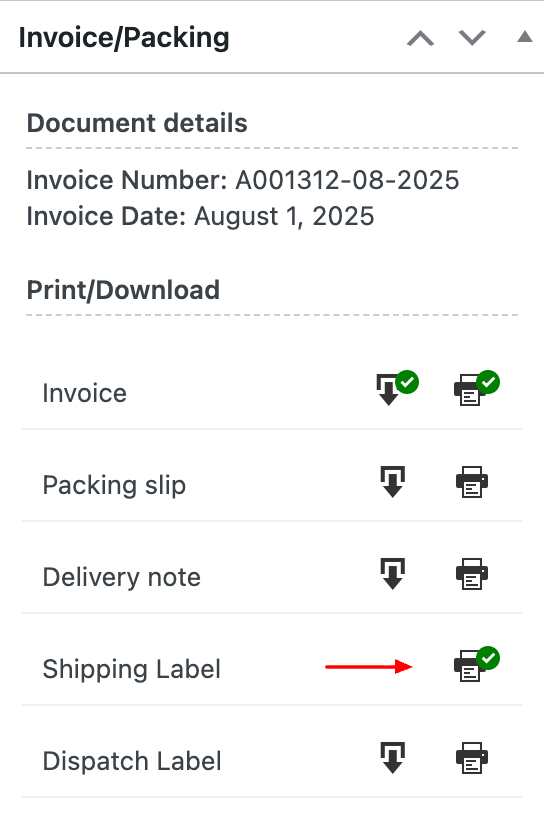
- Go to WooCommerce > Orders and open any order from the list.
- Scroll down to the Invoice/Packing meta box and click on the print icon to print the shipping label document.
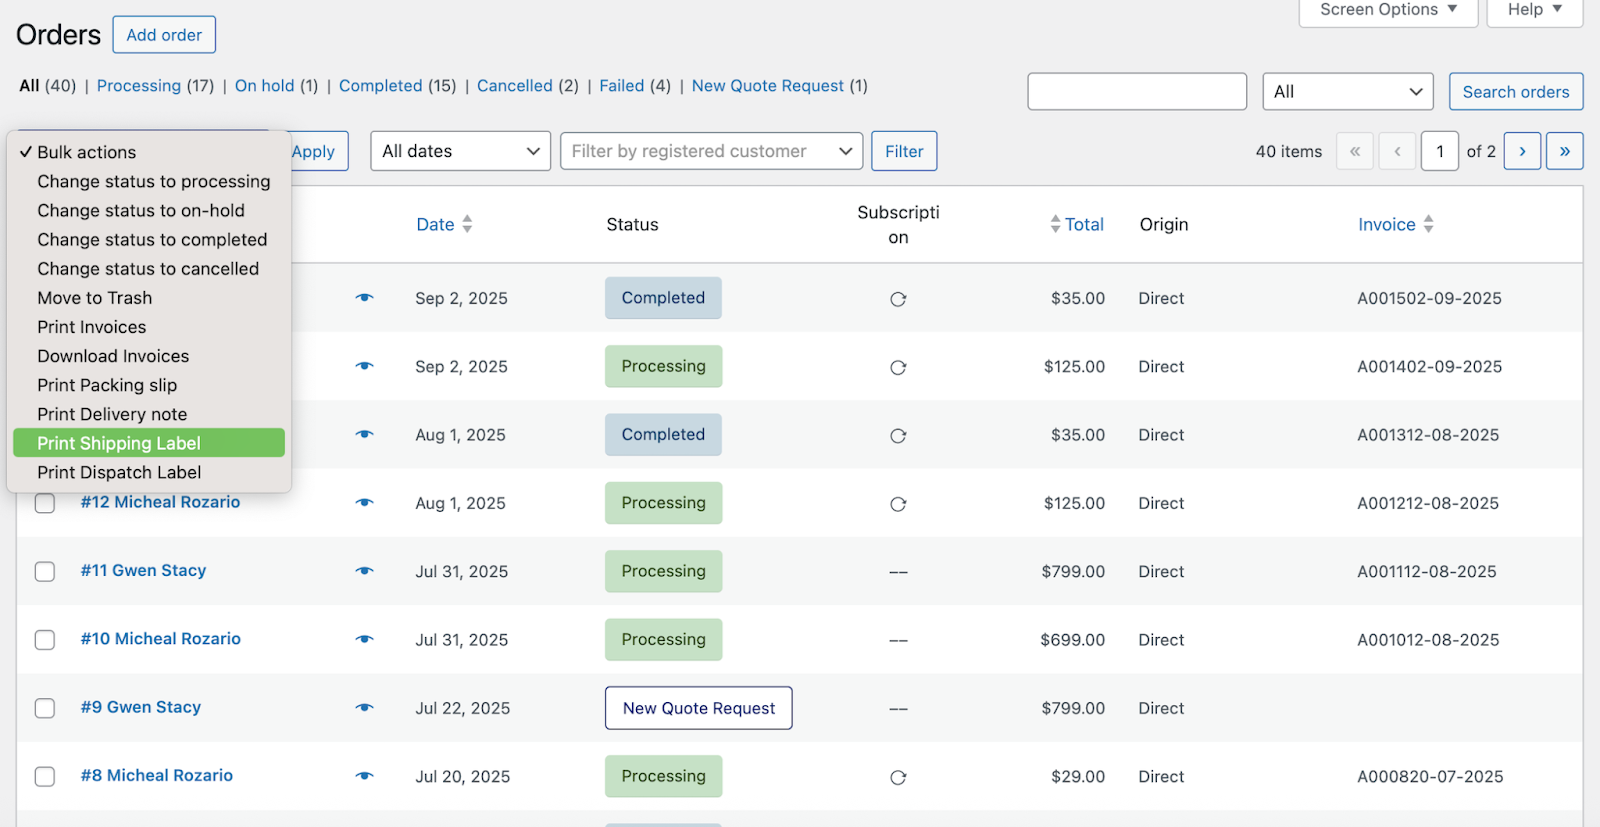
Step 5: Generate and Print Multiple Labels
- Open your WooCommerce Orders page and select multiple orders.
- From the bulk actions menu, choose the Print Shipping Label
The plugin will generate the labels instantly, using the format you defined earlier. You can preview them before printing to confirm accuracy.
With these steps, you’ve set up a complete process for generating and managing shipping labels inside WooCommerce. From design to printing, everything is now handled within your store’s dashboard.
While the core plugin already gives you plenty of control, some store owners prefer even more room for personalization. That’s where the WooCommerce Shipping Label Customizer bundle steps in. This add-on allows you to fine-tune every part of your shipping labels, from font styles and alignments to advanced branding elements.
Beyond Shipping Labels: Explore Other Essential WebToffee Plugins
Alongside shipping labels, WebToffee offers a range of plugins that solve different needs for WooCommerce users. Here are three worth exploring:
GDPR Cookie Consent Plugin
Cookie compliance is a critical part of running any online store. The GDPR Cookie Consent plugin helps you implement cookie banners and consent management in line with data privacy laws. It lets you display consent notices, block cookies until approval, and customize how the banner appears to visitors.
For businesses targeting European customers, this plugin makes it easier to stay compliant without complex setup.
PDF Invoices and Packing Slips
Invoices and packing slips remain essential documents in eCommerce. WebToffee’s PDF Invoices & Packing Slips for WooCommerce automates this process, generating professional invoices and slips directly from the order page.
It provides a reliable way to standardize order documentation without effort, making it easier for both store owners and customers to stay organized.
Product Import Export Plugin
Managing product data can be challenging as your catalog grows. The WooCommerce Export Import Products plugin allows you to transfer product details in bulk using CSV files. Whether you’re migrating products, updating pricing, or syncing product information across different platforms, this plugin reduces manual work significantly.
It’s particularly useful for stores with large inventories or those that frequently update their product catalogs.
Wrapping Up
Shipping labels may seem like a small part of your WooCommerce store, but they play a vital role in the order fulfillment process. With the right plugin in place, generating them becomes quick, accurate, and consistent, freeing up valuable time that can be spent on growing your business.
The WooCommerce Shipping Labels plugin by WebToffee takes the guesswork out of managing shipping documents. From customizable templates to bulk printing, it offers everything needed to keep your shipping process smooth and professional.
By setting up automation for labels and dispatch notes, you’re not just keeping up with basic eCommerce practices; you’re making sure every order leaves your store with the right details, presented in a way that reflects your business standards.